Knot · Beginner · 8 min
Wrap knot: the clean way to close a bundle of cords
A dense coil of cord that binds a bundle and hides its own tail. It is the knot that finishes plant hangers, gathers the fringe of a wall hanging and hides the join where two rows meet.
Published 5 Sep 2026 · · 3-ply twisted cotton 4 mm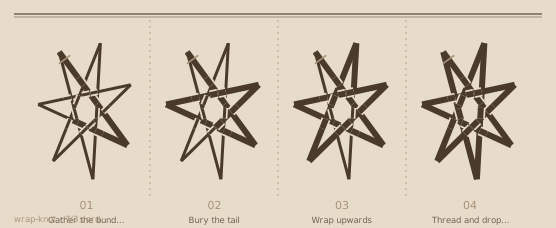
At a glance
- Kind · Knot
- Level · Beginner
- Working time · 8 min
- Cord · 3-ply twisted cotton
- Thickness · 4 mm
- Sample · 3 cm wrap closing a 8-cord bundle
- Finish · tail hidden inside the wrap, bundle squared
Gather the bundle
Hold the cords you want to bind in one hand and fan them flat rather than twisting them into a rope; a flat bundle wraps evenly.
Bury the tail
Fold a 25 cm length of cord in half, lay the loop end upwards along the bundle and wrap over it. The loop is where the tail will finish.
Wrap upwards
Wind the working cord upwards over the bundle, keeping each turn hard against the one below so no bundle cord shows through.
Thread and drop the tail
Pass the working end down through the buried loop, then pull the loop's other end so the loop and the tail disappear under the wrap.
Turn count is a number, not a guess
Wrap height is roughly 2 mm per turn on a 4 mm cord, so a 3 cm wrap takes about 14 turns. Count them. Wraps that loosen over the following week are almost always wraps that were counted by eye and came out at 10 turns instead of 14, leaving the bundle with nothing to bite into.
The subtlety of the buried loop
The trick that makes the wrap look endless is a 25 cm scrap of cord folded in half and wrapped over, so its loop hangs out of the bottom. When the working end is threaded through that loop and the loop is pulled, the working end is drawn down inside the wrap and disappears. Skip this and you are left with a tail sticking out of the top of an otherwise perfect finish.
Wrap before you cut
Always bind the bundle first and trim the cords afterwards. Trimming first means the bundle fans out while you wrap and the coils bite unevenly. Cut the cords 2 cm below the bottom of the wrap, and cut on a slight curve rather than straight across: a straight cut on cotton fringe looks mechanical and shows every uneven cord end at once.
Where a wrap belongs
The wrap is a structural knot as well as a decorative one. Anywhere a group of cords has to change from a loose fringe to a single mass, a 2 to 3 cm wrap is what takes the load. On a plant hanger it carries the weight of the pot; a wrap under 1.5 cm on a 4 mm cord is a decorative band and will creep under load.
Cord cost and what to cut
A wrap consumes about 2.5 cm of cord per turn once the cord is pulled tight, because each turn wraps the bundle plus a little of the turn below it. A 14 turn wrap on an 8 cord bundle of 4 mm cord therefore eats roughly 35 cm, and the buried 25 cm scrap is separate. On a plant hanger with three wraps the total is close to 1.1 m of cord that never appears in the finished piece, which is the reason a hanger pattern asks for 320 cm per cord and not the 280 cm the visible measurements suggest.
Where it goes wrong
- Wrapping loosely enough that the cords of the bundle show between turns.
- Wrapping and then trimming, so the bundle fans out mid-wrap and the coil sits unevenly.
- Cutting the fringe dead straight, which highlights every length difference instead of hiding it.
Check before moving on
- No bundle cord is visible through the wrap from any angle.
- The wrap is even in height from top to bottom.
- Tugging the bundle does not make the wrap slide or open a gap.